
I’ve had a DJI drone for a few years now. It’s reliable and super easy to fly. Recently a friend asked me if I had any recommendations for an FPV drone – next thing you know, I was researching how exactly to build an FPV drone of my own. So here’s what I did!
Parts
This was the most daunting step towards building my first FPV drone. There are countless websites, build guides, and YouTube videos – all sharing their opinions and recommendations on the best FPV drone parts. Since I was going for a budget friendly beginners drone build, here’s what I ended up with after my research.
Now, you’ll notice both a link to the product on Amazon, as well as a link to the product on a site called Banggood. Prior to starting this drone building adventure – I had no idea what Bandgood was, but it turns out it’s quite popular in the FPV Drone Building community. They’re a Chinese based company, so shipping takes forever (a few months even) – but their prices are hard to beat. I also want to mention that some links on this page are affiliate links, so I may earn a small commission for any eligible purchases made.
| Part | Description | Buy | |
|---|---|---|---|
| Frame HSKRC TWE210 210mm | Frame Description | Amazon Banggood |
|
| Flight Controller & ESC MAMBA F405 MK2 Stack | Flight Controller Description | Amazon Banggood |
|
| Motors Samguk Series Wei | Motor Description I got the 2600KV version to be specific - this gave me plenty of power. I'd recommend getting the same, or something a little less powerful. As log as they're all the same - you should be good. | Amazon Banggood |
|
| RF Receiver iRangeX Fli14+ Mini Flysky Receiver | RF Receiver Description | Amazon Banggood |
|
| Video Transmitter Eachine TX5258 | Video Transmitter Description | Amazon Banggood |
|
| XT60 | Although the flight controller stack above will come with a short XT60 cable, it's still handy to have a couple extras. You'll also probably need one to power the battery charger below. | Amazon Banggood |
|
| Props GEPRC 5040 V2 5 Inch 3 Blade Propeller | Props Description | Amazon Banggood |
|
| Camera JJA-CM1200 1/3 CMOS 1200TVL | Camera Description | Amazon Banggood |
|
| Battery Charger ISDT Q6 Nano | Batter Charger Description | Amazon Banggood |
|
| Power Supply 24V 16.6A 400W Power Supply | Now if you go with the battery charger above, and I reccomend you do, you'll need to purchase a separate power supply. If you already have a DC power supply that outputs between 10 and 30 volts - you can use that. Otherwise, you'll need to pick up one of these. | Amazon Banggood |
|
| Transmitter / Remote FlySky FS-i6 | Controller Description | Amazon Banggood |
|
| FPV Goggles Eachine EV800D | Goggles Description | Amazon Banggood |
Tools
Now that we have the parts out of the way, there are some basic tools we’ll want to have as well. Although you don’t need exactly the same tools I used, it’ll definitely make the job a bit easier. I already had a lot of these on hand, but here’s exactly what I used.
| Part | Description | Buy | |
|---|---|---|---|
| Soldering Iron | Really any soldering iron will do. I just used this cheap kit I picked up from Amazon a few years ago. Soldering itself isn't difficult - so if you're new to it - building an FPV drone is a great practice! This kit also includes solder and a pair of tweezers - both of which help a lot. | Amazon Banggood |
|
| Wire Cutters | A lot of these wires are so thin, you can just about strip them with a fingernail. However, it's still nice to get a clean cut/strip with an actual wire cutter. | Amazon Banggood |
|
| Electrical Tape | I used some electrical tape to secure the cables for my motors to the frame of the FPV drone. Zip ties can also work here, but I found they may move and loosen over time. | Amazon Banggood |
|
| 8mm Socket Wrench | This helps a lot when tightening the props to the motors. You can also use a some pliers - but an actual socket wrench applies more even force. | Amazon Banggood |
|
Heat Resistant Mat| Since you'll be soldering, a nice and safe work surface is handy. I can hold my iron on one of these and it doesn't even leave a mark. | Amazon |
Banggood |
The Build Process
I’m not going to get into crazy detail here, because there are numerous YouTube videos that describe this process way better than walls of text would ever be able to. But I’ll still give you a quick walk-through.
The Motors & Frame
First up was connecting my 4 motors to the carbon fiber frame. This is super easy, as each motor includes the needed screws and the frame as pre-drilled screw holes. Just line up the holes, make sure the motor wires run down the arm of the frame and screw everything down.
The ESC & Flight Controller
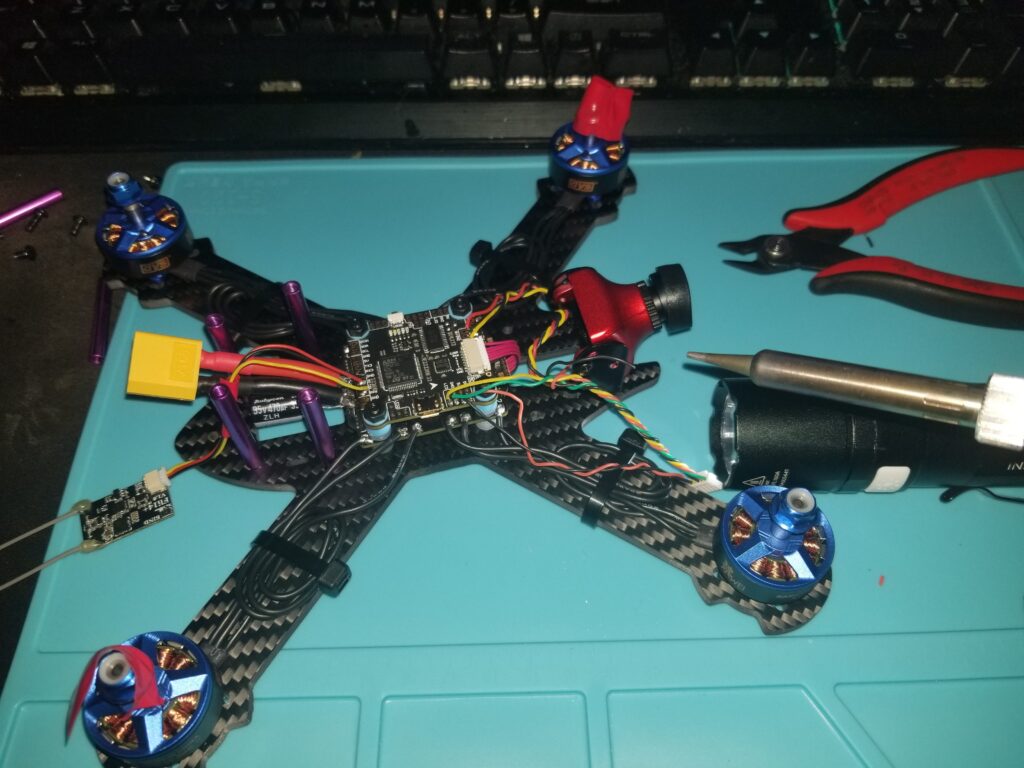
The ESC is the bottom board that comes with our flight controller stack. It’s responsible for power delivery for each of the four motors on our FPV drone. You’ll notice each motor has three wires coming off of it, and there are three pads for each motor on the ESC. Just solder these up in no particular order – as long as each motor is grouped together to the three closest pads. Later on, once we configure Betaflight, we might find that some of these need to be switched around to correct the spin direction of a motor – so be sure to leave a little bit of slack in the cables. I ended up leaving all the slack in my motor cables and just hiding/securing it with zip ties and electrical tape.
Once the motors have been soldered to the ESC we can solder the XT60 connector and capacitor to the input pads on the ESC. Just be sure to pay attention to the positive and negative terminals to ensure correct polarity.
Now we want to solder things like our FPV transmitter, camera, and RF reciever to our flight controller. This is a lot easier to do with the flight controller no installed into the frame just yet. You’ll notice the flight controller came with a little labeled PCB that shows where each connection from the three parts need to go. I would also recommend checking the manuals of each part online to ensure you’re soldering up the correct cables. I accidentally got the power connections on my FPV transmitter backwards and had to Amazon Prime myself a replacement.
Lastly, we can drop on our flight controller. Just add some standoffs and place the flight controller on top of our slack. Be sure that the little arrow on the flight controller is pointing towards the front of the quadcopter. Then connect the little ribbon cable that came with the stack between the ESC and flight controller. Tada!
Final Steps
Now we just need to clean up and and put the top part of our frame on. Once everything is secured – we’re ready to connect the FPV drone to our computer and start programming! For things like the FPV transmitter and RF receiver, I ended up using double sided tape to secure these to the frame. For the most part this has been working well.
Before we just into beta flight, you’ll also need to pair the transmitter to the receiver on the drone. This is usually done by pressing a key combination on the transmitter and then a pairing button on the RF receiver. Once the two are talking, we can proceed to setting up Betaflight.
The Betaflight configuration will take some time itself – there are a handful of little settings that need to be setup. I’m not going to go into detail on that, but I’ve included some videos below that helped me quite a bit. Also worth mentioning, do not attach the props to your drone until you’ve completed the Betaflight setup and are outside and ready to fly.

Maiden Voyage
After spending all day stripping wires, soldering connections, routing cables, programming, and more – I grew impatient and took my newly built FPV drone out for a test flight in the rain. I decided to skip the FPV headset and just fly line of sight at low altitudes. I didn’t have much choice unfortunately, as I fried my video transmitter and the new one hadn’t arrived yet. Also due to this, I did not have the video camera installed. But both weren’t needed for liftoff.
First off, this thing had crazy amounts of power. With very small movements on the controller – this thing shot up like a rocket. I also quickly learned to keep my finger on the kill switch to keep from damaging the propellers, or destroying the lawn as pictured below. 🙂

And all that grass had to go somewhere… In my case – into every nook and cranny on the drone.

So after getting my video transmitter sorted out, I was able to start flying for reach. Here are a few short clips from some of my flights. These were all recorded using the goggle’s built in video recorder – so you’re seeing exactly what I was seeing through the googles.
Tips
First off, I got a lot of help from watching YouTube videos. Especially for configuring the flight controller. Here are a few videos that were extra helpful:
Conclusion
This thing is a blast, but I need a lot of practice. Hopefully one day I’ll be able to perform some of the cool races and freestyle flight you see people on YouTube doing. For now, I’ll be happy when I can just fly in a straight line for more than 30 seconds. 🙂
If you have any questions or tips – feel free to share them in the comments below!